
One the biggest technological advancements in plastics over the last 30 or so years have been the improvement in UV stability. I can remember how fast vinyl dashboards in cars used to split and crack from sunlight exposure. Today, you rarely see that until the car has been in the junk yard for a few years. Even white vinyl siding and fencing seem to hold their color reasonably well for a decade or more. This is thanks to additives manufacturers developing really sophisticated stabilizers and anti-oxidants that can be compounded into various plastic materials.
In this post, I wanted to de-mystify what causes UV damage to plastics and how UV stability is tested.
What Causes UV Damage to Plastics
First, Ultraviolet (UV) light from the sun actually penetrates the plastic and breaks the chemical bonds within the molecules. The full spectrum of visible and non-visible light is thought to do damage but short wavelength light in the UV range is thought to have the most effect. UV damage is accelerated at elevated temperatures as well.
The second thing that damages plastics is photooxidation. This is caused by a reaction between solar radiation and oxygen in the air. Solar radiation damages the oxygen molecules which then become highly corrosive chemicals known as free radicals.
The third thing is referred to as chalking. Chalking is a chemical process that occurs in the presence of solar radiation and water which causes the breakdown of the binding material in colored plastics that result in the release of titanium dioxide (TiO₂) pigment particles. TiO₂ is a white pigment that is used in many colorants. The TiO₂ particles on the surface of the plastic material look like chalk dust thus the term chalking. The particles can be wiped off but they reappear as the chemical process continues to happen. Chalking will be most pronounced in humid or wet conditions.
The processes that I am describing here are very complex chemical reactions that I don’t want to get into. If you want to know more about the mechanisms that cause plastics to break down, there is an excellent Wikipedia article about it.
Weathering Testing
Several methods have been developed to test materials for weathering characteristics. Testing is typically performed on molded plaques or test specimens. The color is measured using a colorimeter on plaques before being exposed and after with the color change being measured. Along with color change, plaques will usually be visually inspected for defects caused by weathering such as chalking. Automotive specifications will refer to this as “no objectionable defects allowed”. Also, test plaques can be exposed and tested for physical property changes. For instance, if you wanted to know what effect 2 years of weathering exposure would have on the tensile strength of a material, you would mold tensile test specimens, test some right away and then expose some to the sun outside for two years and then test them. You could then determine what percentage of the tensile strength was retained after weathering.
Outdoor Testing
The best way to test for weathering is by exposing molded plaques to actual weather in an outdoor environment. This testing typically takes 2 to 5 years. The automotive industry typically tests plastics for exterior use for 2 years. The Society of Automotive Engineers (SAE) has a test method (SAE J1976) that specifies the direction and angle that samples are to be facing and the length of time. This type of testing is virtually always performed in Florida and Arizona. These two environments are considered the most extreme for weathering. Arizona has more direct sunlight exposure and heat but Florida brings humidity and rainfall to the table. Automotive specifications typically require materials to be tested in both environments before approval.
Outdoor weathering testing can be accelerated by using racks that follow the sun’s movement each day or mirrors that follow the sun and reflect light onto the plaques.

Accelerated Weathering
There are two methods for testing weathering characteristics in a laboratory environment using artificial light sources. These methods can accelerate testing by using sources of light that are a lot brighter than sunlight. It should be noted that these methods can accelerate the exposure to light, but they cannot accelerate the effects of humidity and heat. It is very difficult to correlate between accelerated weathering and actual weathering because of this. Even outdoor weathering has some inherent uncertainty due to the fact that the weather is not consistent from year to year.
There are primarily two types of accelerated weathering tests performed
QUV testing uses fluorescent bulbs as the light source. Plaques are put in a flat rack that exposes them to the light source. QUV testing machines typically use water misters to add humidity and simulate dew formation in the morning.

There are currently several test methods used for QUV testing including ASTM G 154, ASTM D 4329, ASTM D 4587 and ISO 4892.
QUV requirements typically specify a total number of hours of exposure and the light bulbs might also be specified. Typically bulbs that produce very short wavelength light are used as this type of light is considered to be the most damaging. Most test methods will also spell out a light/dark cycle to be used. A certain amount of time with the light source on followed by a certain amount of time with the light source off to simulate day/night cycles. These cycles will also spell out when water might be sprayed on the samples.
I have not seen QUV testing used for automotive applications in a long time. Typically xenon arc testing is used for automotive.
Xenon arc testing uses a bulb that passes electricity through ionized Xenon gas at high pressure. This type of light bulb is used in IMAX movie projectors. This light source produces the full spectrum of light, not just the shorter wavelengths. It is thought that the longer wavelength light may have more impact on color change in plastics than the shorter wavelength light. This might be why this method of testing is used so commonly in automotive testing.

Xenon arc testing machines also use water misters to achieve humidity. The plaques are arranged in a barrel shaped rack that surrounds the light source.
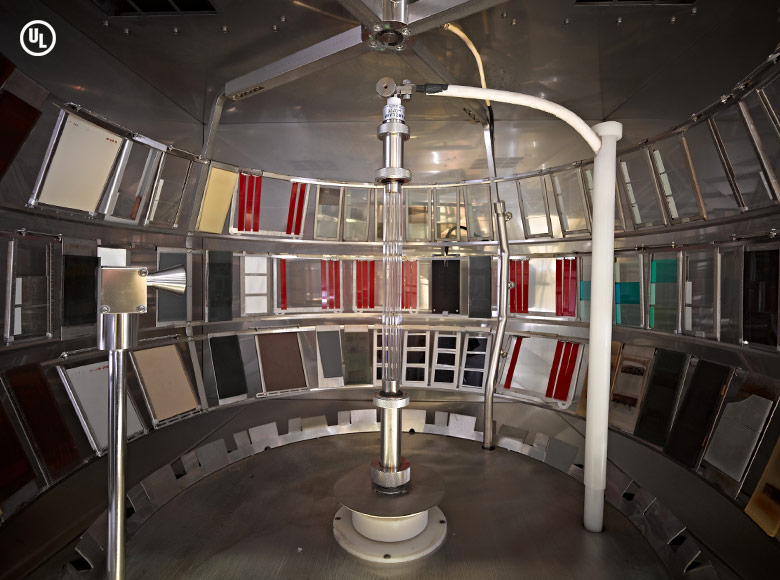
There are currently several test methods used for xenon arc testing including ASTM D 2565, ASTM D 4459, ASTM G 155, ISO 4892, SAE J2412 (replaced J1885) and SAE J2527 (replaced J1960).
Like QUV testing, the test methods typically call out light/dark cycles and water mist cycles. Xenon arc testing will not be specified in hours but in kJ/m². This is a measurement of the total light energy that the plaques are exposed to. It is calculated using the following formula.
kJ/m²=Watts/meter² x 3.6 x hours
Think of it this way. The wattage of the bulb is the power that the plaques are exposed to. Multiply this times the amount of time that the plaques are exposed and you end up with a number that represents the total energy that the plaques were exposed to.
Correlation between Accelerated and Outdoor Testing
Because of the difficulty in correlating between outdoor testing and accelerated testing, most specifications will require accelerated testing to be performed in conjunction with outdoor testing.
As a guideline, accelerated testing can usually speed up testing by about 6 times. In other words, 2 months of accelerated testing equals about 1 year of outdoor exposure. Some experience also indicates that 2500 kJ/m² of Xenon arc testing is roughly equivalent to 1000 hours of QUV testing and roughly 1 year of outdoor exposure. These are very rough guidelines as actual results will be dependent on the material and color being tested as well as the variability inherent in all of the testing.
Automotive Weathering Tests
As I said, xenon arc testing is most commonly used for automotive testing. In addition to exterior parts, interior parts also require some UV testing as many interior parts are exposed to sunlight through the car windows.
Interior UV Testing
Materials for interior parts are typically testing using the test method SAE J2412 which replaced J1885 in 2008. The test method requires a light dark cycle of 3.8 hours light followed by 1 hour dark. This cycle gets repeated until the test is complete. It calls for 95% relative humidity (RH) during dark and 50% RH during light. No water spray is required for interior testing as these parts would not expect to be exposed to rain or dew formation.
Typical exposure for interior materials is 1250 kJ/m² for materials that might be exposed to direct sunlight (dashboard, rear parcel shelf for example). Materials used for parts that will see less exposure might only require 263 kJ/m² of exposure. ABS materials are not typically used in applications with direct exposure so ABS specifications will typically require 263 kJ/m².
Exterior Weathering Testing
Materials for exterior parts are typically tested using the test method SAE J2527 which replaced J1960 in 2008. The test method requires a light dark cycle of 40 minutes of light followed by 20 minutes of light with water spray followed by 60 minutes of light followed by 60 minutes of dark. This cycle gets repeated until the test is complete. It calls for 95% relative humidity (RH) during dark and 50% RH during light.
Typical exposure for exterior material is 2500 kJ/m². Only materials like TPO, ASA, PC/ASA, PVC and a few nylons can survive this testing so these are the only materials ever used on the outside of a car unless they are painted or chrome plated.
Outdoor Weathering Testing
Materials for exterior applications will not be approved for automotive use based on accelerated testing alone. Actual outdoor exposure testing must be completed. The test method used for outdoor exposure is SAE J1976. This will require 2 years in Arizona and 2 years in Florida testing both. Materials for interior UV testing do not require outdoor exposure.
Colorfastness to Light
Some exterior specifications also callout a colorfastness to light requirement in addition to accelerated weathering. These requirements typically use the interior UV test method (J2412) with exposure amounts that are roughly half of the requirement for accelerated weathering testing. For instance, one specification that I read calls out 2500 kJ/m² for accelerated xenon arc exposure and also a colorfastness to light requirement of 1240.8 kJ/m² exposure. Some specifications call for a colorfastness to light requirement of just 601.6 kJ/m².
I am not sure what the purpose of this requirement is. It may be that it isolates the effects of light exposure by removing the water spray requirement. The lower exposure reduces the time that it takes to complete the testing also. It might be useful as an early indicator of problems. If anyone knows what the purpose of these requirements is, leave a comment below.
Conclusion
If you are working on an application that requires outdoor weathering or interior UV stability, there are a few things to keep in mind. If you are not sure what you need, automotive industry interior UV and exterior weathering specifications are a good place to start. Also keep in mind that darker colors always hold up better. This might seem counter intuitive but the dark color keeps the light from penetrating as far into the plastic. Black colored plastic will do pretty well in an exterior application without any additives and for interior UV applications; black colorant is typically all you need to provide adequate protection. No ABS or polystyrene should ever be used for an exterior application. No amount of color concentrate or UV package can stabilize either of these materials enough for exterior use. Color concentrate and additive manufacturers are excellent resources for designing a weathering package to achieve the goals for your application. They can usually also provide weathering testing for you at reduced prices.

Have learned from your post, thank you so much. Are you interested in Light & Weather Fastness Tester ? It’s a relative machine which may help your testing a lot. You can see more in:
testextextile.com/product/light-weather-fastness-tester-tf420/
LikeLike